On Managing Versions and Virtual Environments
As a junior developer, I had single project at hand all these days. Even if a new project used a different python version, I just installed the new version over the currently installed one. When I was told I had to take up a new project in parallel, I realised that managing versions is a bit of headache.

Usually it isn’t that big of a deal when you’re dealing with Python 2.x and Python 3.x, as you can just call python2 and python3 when you’re running the scripts. However, when we’re dealing with subversions in 3.x or 2.x versions itself, it is better to use package managers. Time to introduce the big guns I’m talking about — pyenv and venv (venv since Python 3.3 and virtualenv for 2.x and 3.x).
Note that this is the workflow which I found convenient, and is subjected to change with increase in proficiency. That being said, it is still a very efficient way. Do leave me suggestions in comments, if any.
Installation
There are some prerequisites before installing pyenv, do visit the page to make sure you’re not missing any. There are two ways of installation, one is using pyenv-installer or the manual compilation. The pyenv wiki suggests to use @kirankotari’s pyenv-win fork if you’re on Windows as pyenv does not work on windows outside the Windows Subsystem for Linux. Might be a good option.
To manually compile, you need to clone the GitHub repository. Detailed instructions are here. pyenv-installer looks like a good option too, this link contains the installation steps in detail.
MacOS users can just use homebrew, which is what I did. Run
$ brew update
$ brew install pyenv
That’s it, you’re done.
Next step is to install venv/virtualenv. For a brief introduction, this is a tool to create isolated Python environments. The venv module is just a subset of virtualenv since Python 3.3, which has been integrated to the standard library. This post mainly focuses on versions of Python 3.3 and above, so the steps here follow venv, though the steps are very similar for virtualenv as well.
Best way of installing these tools is using pip. To install pip, run the following commands.
For MacOS/Linux,
$ python3 -m pip install -user -upgrade pip
Replace with python2 if you’re trying with 2.x versions.
For Windows, run,
$ py -m pip install --upgrade pip
Next, run the following commands to install virtualenv using pip.
For MacOS/Linux, run,
$ python3 -m pip install — user virtualenv
For Windows,
$ py -m pip install -user virtualenv
Now the package managers are ready to use.
Usage
pyenv is used for installing the required python version.
$ pyenv install --list
This command gives the list of packages available for download. Choose the required python version from the list.
$ pyenv install -v <version_number>
This installs the required Python version. It takes a really long time, as this step compiles Python source code. You can see the installed versions in the system by running
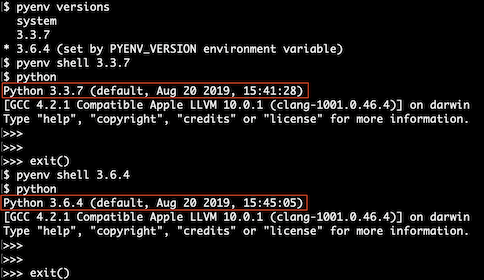
$ pyenv versions
The next step is to activate the specific Python version. There are two ways to do this. One is using the pyenv shell command, and other by setting the $PYENV_VERSION variable. First, add eval "$(pyenv init -)" to the .bash_profile and source it. This enables pyenv to add the Python version to the path. For the second step, either you can run $ export PYENV_VERSION=<version_number> or $ pyenv shell <version_number>, both do the same job. You can verify that the Python version chosen is active by starting your IDLE.
Now we have the necessary Python environment activated. Next step is to create a virtual environment to import the necessary packages.
On MacOS/Linux, run
$ python -m venv <env_name>
On Windows, the corresponding command is
$ py -m venv <env_name>
On Python versions before 3.3, replace the venv by virtualenv. venv is one of the default packages in Python 3.3 and above, so there is no installation required as such. However, virtualenv has to be installed.
Now to activate the environment,
On MacOS/Linux,
$ source env/bin/activate
On Windows,
$ .\env\Scripts\activate
This adds the virtual environment-specific python and pip executables into the shell’s path.
To deactivate the environment, simply run $ deactivate.
Final Thoughts
That’s it, folks! This is one of the intuitive ways to manage multiple versions and virtual environments. This however, involves a lot of steps, and got me to thinking that there could be an easier way. Turns out, there is. Check out pyenv-virtualenv. As the name suggests, this is a pyenv plugin that provides features to manage virtual environments. Inherently this plugin follows similar steps and is much simpler. More on this in upcoming posts. If you did like this article visit Medium and do give me a clap.